 ÆthelHook
Guide
How to approve Claude Code, Codex, and four other AI agents from your phone
A step-by-step walkthrough of setting up remote control for Claude Code, Codex, OpenCode, Gemini CLI, GitHub Copilot CLI, and Devin CLI with ÆthelHook, so tool calls, plan reviews, and questions can be answered from your phone instead of your IDE. Most of these agents need one small extra step beyond the base install, covered in full below.
What you need
- A Windows PC running at least one of: Claude Code (CLI or VS Code extension), Codex (CLI or IDE), OpenCode, Gemini CLI, GitHub Copilot CLI, or Devin's standalone terminal CLI.
- An Android phone.
- No account and no subscription, both installs are free.
1. Download the installer and the app
Grab the Windows installer and the Android app from the download section on the homepage - the phone app is on Google Play, and the Windows installer is on the GitHub releases page.
2. Run the installer on your PC
Run AethelHook-Setup.exe as Administrator. It installs a background service and the tray app, then opens the tray app automatically. Look for the ÆthelHook icon in your Windows system tray, the row of small icons near the clock. Click the small up arrow (^) if you do not see it right away.
3. Install the app on your phone
Install ÆthelHook from Google Play like any other app, then open it.
4. Pair your phone with your PC
In the tray app window, click Pair New Device. Windows Hello asks you to confirm with your PIN, fingerprint, or face before it shows a QR code, so pairing a new device takes more than just a scan. Open the app on your phone, go to Settings, and tap Scan QR to Pair, then scan the code from the tray window. Each device gets its own token, and the connection is end-to-end encrypted with certificate pinning, not a shared cloud relay.
Only one phone is ever the active connection. Pairing a new device makes it the sole active one, whichever phone was previously connected gets a plain notification that its connection ended, no approval prompt on that phone, since the decision already happened on the PC via Windows Hello. If Windows Hello is not set up on your PC at all, pairing still works, just without that extra confirmation step.
5. Optional: install Tailscale for mobile data
Pairing over the same Wi-Fi network works automatically with no extra setup. If you want approvals to keep working when your phone is on mobile data and your PC is somewhere else entirely, install Tailscale on both devices (free for personal use), sign into the same account on both, and enter your PC's Tailscale IP in the ÆthelHook app's Settings tab.
6. Extra step for Codex, OpenCode, Gemini CLI, or Devin CLI
Claude Code and GitHub Copilot CLI need nothing beyond the steps above, their hooks are trusted automatically. The other four agents each need one more small step before ÆthelHook can see their tool calls.
Codex: trust the hooks
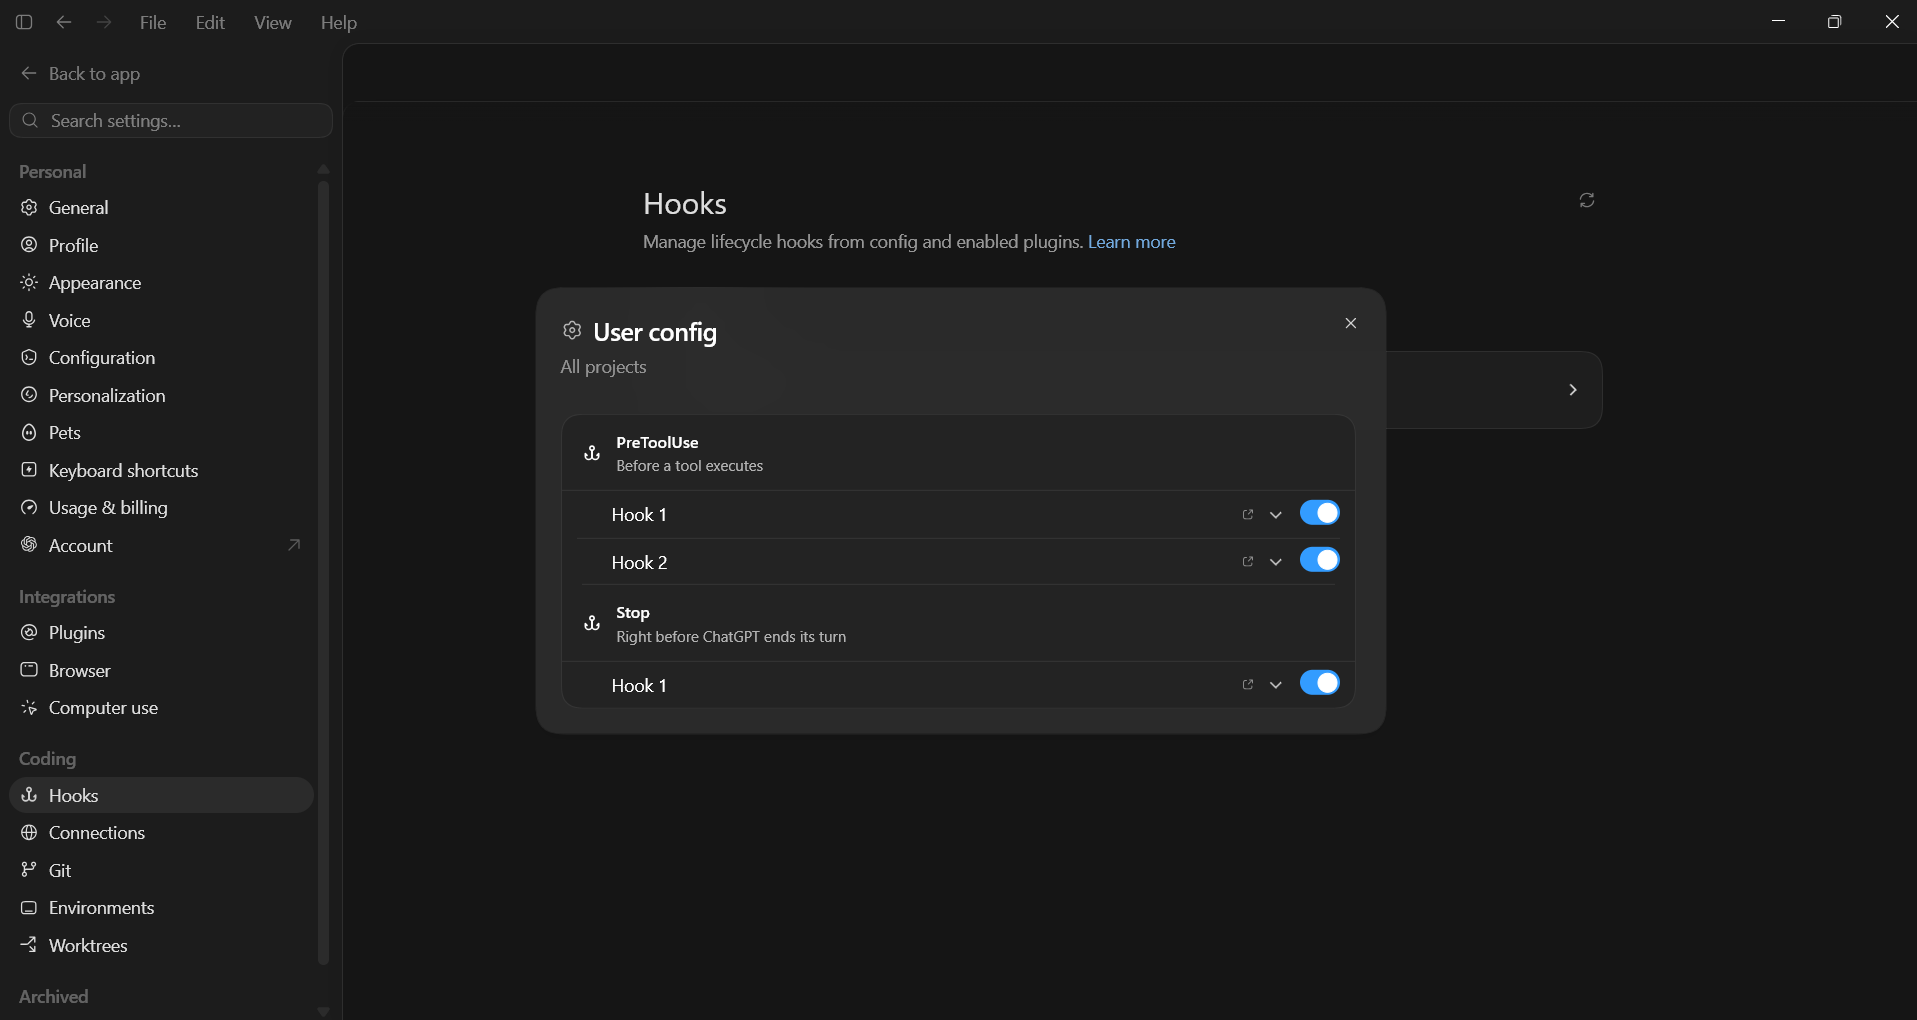
The Windows installer writes three hooks into Codex's own configuration, but Codex will not run a hook until you explicitly trust it, this is a Codex safety feature, not something ÆthelHook can skip on your behalf. Open Codex and go to Settings > Hooks. You will see two events, PreToolUse with two hooks under it, and Stop with one hook under it, three hooks in total. Click the Trust button that appears next to each toggle, once for each of the three hooks. Until all three are trusted, Codex tool calls will not reach your phone.
OpenCode: install with npm
ÆthelHook currently only knows how to find an OpenCode install done through npm. Install Node.js if you do not already have it, then run:
npm install -g opencode-aiOpenCode installed another way, a direct binary download, Scoop, or Chocolatey, will run fine on its own but ÆthelHook will not be able to locate it for Session Access, the headless phone-to-PC prompt feature. Approval gating is unaffected either way, it only needs OpenCode's own config folder to exist, not a specific install method.
Gemini CLI: install with npm, then trust the folder
Install Node.js if you do not already have it, then run:
npm install -g @google/gemini-cliGemini CLI refuses to run tools, and refuses to fire any hook at all, in a project folder it does not trust yet, a Gemini CLI safety feature, not something ÆthelHook can skip on your behalf. The first time you run gemini interactively in a project, accept its trust prompt if one appears. Session Access, ÆthelHook's phone-to-PC prompt feature, trusts the folder automatically before every headless run, so this step only matters for using Gemini CLI yourself in your own terminal.
Devin CLI: the standalone terminal CLI, not the Devin IDE
This is Cognition's separate devin terminal CLI, not the Devin IDE (a rebranded Windsurf editor). The IDE never fires hooks at all, so ÆthelHook can only gate the standalone CLI. Install it on Windows with:
irm https://static.devin.ai/cli/setup.ps1 | iexThen, in a real terminal window, since this step reads console input directly and cannot be scripted or piped, sign in once:
devin auth login
devin setup
After that one-time login, every devin tool call routes to your phone the same as the other agents.
7. You are done
From here, every tool call, plan review, and clarifying question from whichever of the six agents you use routes to your phone. You can allow once, always allow for that project, always allow everywhere, deny, or deny with a reason fed back to the agent, all from the notification.